Clip In Clips

Clip-in-clips offer significant "installed cost" savings as they snap into a pre-punched hole. For each series of fastener three clip-in-clips are offered that cover most common sheet thicknesses.
When a clip-in-clip is installed a gap (dim. Q) is always formed between the two panels, caused by the legs of the clip sitting on the top face of the fixed panel. This gap needs to be calculated to determine whether it has to be included in the calculation of the grip stud length (dim. H as shown in component selection) This is done by subtracting the thickness of the panel into which the clip fits (dim. Z) from the constant (dim. R) given in the following table for each clip-in-clip.
If the panels are required to fit as flush with each other as possible the gap must be included in dimension H. If there is already a gap between the two panels (dim Y), for example caused by a return edge, then only the greater gap dimension need be included in the calculation of dimension H.

| Type | Panel Thickness Range (dim. Z) | Part No. | Dimension R (Constant) |
| 400 Series | 0.5 - 0.99 | 430101 | 1.5 |
| 1.0 - 1.69 | 430102 | 2.0 | |
| 1.7 - 2.4 | 430103 | 2.8 | |
| 600 Series | 0.6 - 1.29 | 430105 | 1.9 |
| 1.3 - 2.19 | 430106 | 2.6 | |
| 2.2 - 3.7 | 430107 | 4.2 | |
| 1000 Series | 1.2 - 1.69 | 430109 | 2.6 |
| 1.7 - 2.89 | 430110 | 3.5 | |
| 2.9 - 3.7 | 430111 | 4.6 |
Clip In Installation
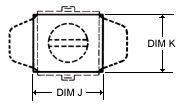
Clip-in-clips snap in from the front of the panel into pre-punched rectangular holes. The hole sizes for each series of clip is given below and the hole is the same for all panel thickness within a series.
 |
 |
 |
| Fit clip in panel with one edge under panel | Insert tool in clip and lever over | Clip is locked in panel by retaining lances |
Clip-in-clip Panel Preparation

Dim J is parallel to the axis of the jaws of the clip.
| Type | J | K | Tool Part No |
| 400 Series | 8.7 ± .01 | 9 ± .01 | 470011 |
| 600 Series | 13 ± .01 | 12 ± .01 | 470012 |
| 1000 Series | 20 ± .01 | 16.5 ± .01 | 470013 |


